Integrations
Hosted Blog
A fully hosted blog on your own subdomain, no CMS required.
Grandranker hosts a blog on your own subdomain (blog.yourdomain.com). You add one DNS record; every article you publish goes live automatically, with SSL. No code to paste.
What you need: a domain you own and access to its DNS settings so you can add one CNAME record.
How to Connect
A three-step wizard under Integrations → Hosted Blog.
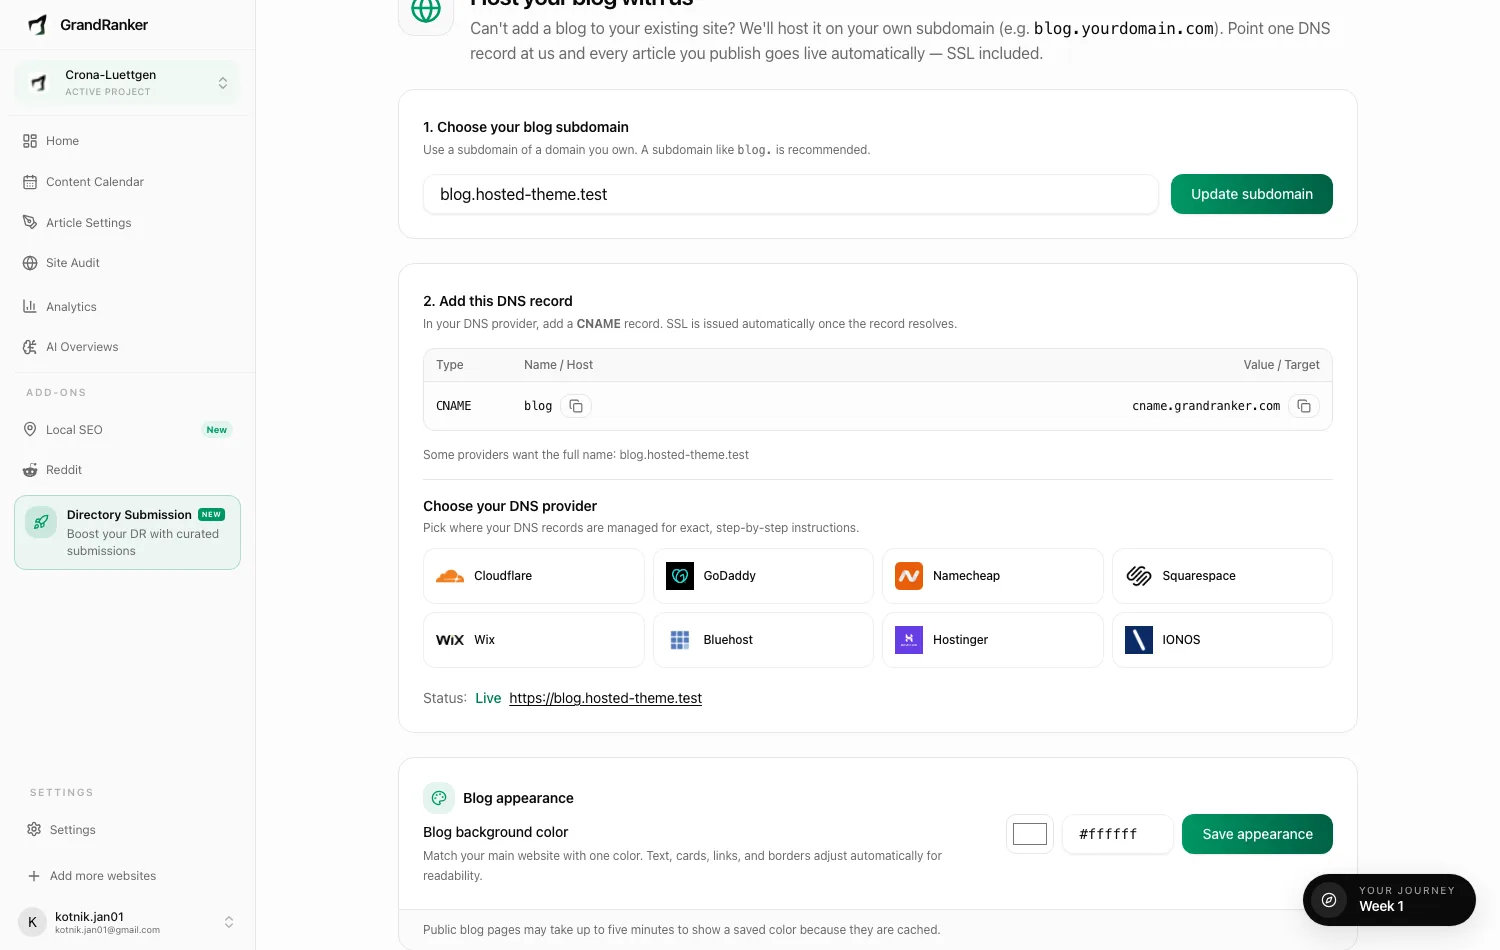
1. Choose a subdomain
The field arrives pre-filled, usually with blog., or with news. or insights. if blog. already points somewhere.
Type your own if you prefer, then choose Continue.
Never use your website's own address (www.yourdomain.com or the bare domain).
Pointing that at us takes your website offline.
2. Add the DNS record
The wizard shows the exact CNAME record to create, with a copy button for its Name and its Value.
Most DNS providers want just the label (blog); some want the full name (blog.yourdomain.com).
Above the record, a message says what we can see right now: no record yet, a record pointing somewhere else, an A record where a CNAME belongs, or the right record. Next to the record, a guide for your DNS provider walks through the same steps. If we recognise your provider, its guide opens first; otherwise pick it from the list or follow the general steps.
On Cloudflare? When your domain's DNS is on Cloudflare, the wizard offers Connect Cloudflare. Sign in, pick the Cloudflare account that holds your domain, and we add the record for you. We ask only for permission to read and edit DNS records, and store no password. Use either the automatic setup or the manual record, not both.
3. Go live
Nothing left to click. The page checks for your record by itself every 15 seconds (Checking for DNS) and moves to step 3 once the record is right. We then issue the HTTPS certificate on our side, which usually takes a few minutes, and the status turns Live.
In Blog appearance, pick a background color (picker or six-digit hex) and click Save appearance. Text, cards, links and borders adjust automatically so light and dark backgrounds stay readable. Pages are cached, so a color change can take up to five minutes to appear.
When the status reads Live, the wizard links to your blog URL.
Until your blog is live
We keep writing articles for the first 3 days after you choose your subdomain, so some are ready the moment the blog goes live. If the blog still isn't live after 3 days, we pause new articles until it is:
- The banner at the top of the app names your blog address, says articles are paused and links back to this setup.
- Scheduled articles stop, and asking for an article by hand shows the same message.
- The articles already written stay in your account.
The reminder email we send a day after setup names the date the pause would start. When the blog goes live, articles start again on their own, and your content plan moves forward so it carries on from that day.
Step-by-step for your DNS provider
 CloudflareIncludes our one-click automatic setup
 GoDaddyAdd the CNAME in Domain Portfolio → DNS
 NamecheapAdd the CNAME in Advanced DNS
 SquarespaceAdd a custom record in Squarespace Domains
 WixAdd the alias in Manage DNS Records
 BluehostAdd the record in the Bluehost Portal
 HostingerAdd the CNAME in hPanel DNS records
 IONOSCreate the subdomain, then its CNAME
Provider not listed? The record is the same everywhere: a CNAME with the Host and Target shown in the wizard.
Designing your blog
Once the blog is Live, the Blog designer appears on the same screen (Integrations → Hosted Blog → Designer). Changes save automatically and show in the live preview.
- Look. Pick Clean, Magazine or Editorial — each sets header, article list, article and font in one click. Fine-tune sets those four individually. Below: logo upload, logo height, and whether your business name shows. Both link back to your main website.
- Menu. Up to 8 header links (each with a dropdown) plus 2 buttons, and up to 8 footer links. Put Impressum, Datenschutz, contact and terms in the footer.
- Pages. Your own Markdown pages, each at its own address —
/impressum,/datenschutz,/kontakt. Uncheck Published to hide one. Published pages appear in the sitemap. - Authors. Add real author names, roles, biographies and optional external profile links. Click Save author to apply each profile. Use the same name as the article byline to connect the profile; renaming a profile does not rename existing bylines. Profiles with published articles get an author page and linked bylines. You can edit or remove profiles here.
- Advanced. Choose Show advanced settings to reveal it.
Advanced
- Custom CSS. Applied after our styles, so it wins.
- Custom head code. Goes into every page's
<head>as written — cookie banner, analytics, verification tags. Scripts run on your blog, so only paste code you trust. It does not run in the designer preview; open the blog itself to test. - Serve the blog under your main domain. If your site proxies a path (for example a Next.js rewrite of
/blog/*), enter the address visitors see, such ashttps://example.com/blog. Canonical tags, sitemap entries, structured data and internal links then use that address instead of the subdomain. Leave empty if you are not proxying.
Running under GDPR/DSGVO? Leave the GA4 field empty and choose the System font preset — the blog then loads no third-party requests at all until your own consent tool allows them.
Publishing & Verifying
Nothing to configure — published articles appear on the blog automatically. To verify, check that the status line reads Live, then open the blog URL and confirm your articles render over HTTPS.
Article lists show 12 articles per page, with Previous and Next links. Topic archives group published articles by category. Articles also link to more reading from the same blog, preferring their category.
Each blog has an XML sitemap at /sitemap.xml, including every published article, published page and populated topic or author archive. There is no longer a 200-article listing limit. Its robots.txt advertises that sitemap for search engines. You can also submit the sitemap URL in Google Search Console for a property that covers your blog's address.
Article dates use the first known publication date. An Updated date appears after a content change; background checks and republishing alone do not refresh it. Existing links to other published articles on your blog resolve to the blog address automatically.
Hosted pages allow large image previews in search. Newly processed featured images keep at least 1,200 pixels of width when the original has that resolution. Smaller originals are not enlarged, and existing images are not regenerated. Search engines decide whether to show a large preview; these settings do not guarantee rankings or traffic.
Disconnecting removes the subdomain and stops serving the blog. Your articles and pages stay in Grandranker.
Troubleshooting
The page still sees no DNS record
DNS changes take minutes to hours to reach the internet. Check that the CNAME exists at the company that runs your domain's DNS (the one your nameservers point to, which is often not the company that built your website), and that its value matches the Value in the wizard exactly. Then leave the page open; it checks by itself.
The page says your record points somewhere else
It names the address it found.
Change the record's value to the one the wizard shows.
If the address it found is one of ours, such as grandranker.com, the blog may still go live as it is; switch to the wizard's value if it isn't live within a few hours.
My DNS provider rejected the record or created a weird name
- Wrong name format. Entering
blog.yourdomain.comat a provider that adds your domain automatically givesblog.yourdomain.com.yourdomain.com. Use justblogthere. Others want the full name; the wizard shows both. - Your domain added to our address. If the page says your record points at
cname.grandranker.com.yourdomain.com, your provider (Gandi does this, for example) treated the value as incomplete because it was saved without a dot at the end. Entercname.grandranker.com.with the dot, orcname.grandranker.comon its own if the form won't take the dot. - Wrong record type. It must be a CNAME, not an A record.
The Cloudflare automatic setup fails
- On Cloudflare's consent screen, pick the account that holds your domain. Another account can't see it.
- Connect Cloudflare only appears when your domain's DNS is on Cloudflare. If your domain is registered with Cloudflare but its DNS is somewhere else, add the record there.
- If it still fails, add the record by hand. The steps are the same.
New articles stopped
If your blog isn't live 3 days after you chose the subdomain, new articles pause until it is (see Until your blog is live). Finish the DNS record; articles start again on their own once the blog is live.
Status shows "Setup failed"
Re-check the DNS record against the wizard's values and fix any mismatch; the page retries on its own. If the record is correct and it still fails, contact support.
Still stuck? [email protected]